- Farm & Garden
- Pumps & Motors
- Food Processing
- Workshop, DIY & MRO
- Lab & Measuring Tools


Brand: Generic ( Made in India )
DG-Tech 1800 W Airless Paint Sprayer, 2.5 LPM Max. Volume Flow
SKU: TI-D1-46076 Estimated Delivery By: Jul 23 - Jul 25


MRP : ₹34500 ₹28999
16% OFF!
Estimated Delivery By: Jul 23 - Jul 25 Easy Return
& Refund
& Refund
Quality
Assurance
Assurance
Trusted
Delivery
Delivery
After Sales
Assistance
Assistance
Buyer
Protection
Protection
₹28999 (Including GST)
MRP : ₹34500
16% OFF!
Get Extra ₹435 OFF on Prepaid Orders
QTY :
-
1
+
Short Description
DG-Tech 1800 W Airless Paint Sprayer
1000-3000psi Pressure Range
Country of origin: India
Specifications
- Brand: Generic ( Made in India )
- Weight (Approx.) : 21 kg
- Voltage : 220V~50Hz
- Motor Rating : 1800W
- Hose Close Nipple : 1/4"
- Max. Volume Flow : 2.5L/Min
- Range of Pressure : 1000-3000psi
- Hose Length : 13 Meters
Description
The DG-Tech 450 Airless Paint Sprayer is a powerful, high-end paint sprayer capable of imparting fine paint coverage at speed. It is powered by a strong 1800W motor and capable of pushing out high volumes of paint (flow rate of 2.5 L/min). The machine can be used for heavy-duty painting works on construction sites. Painting large outlets, exteriors and industrial paints equally requires application of the Machine; therefore, it is a painter's or contractor's choice.
Features
:- 1800W Powerful Motor : Ensures dependable performance for continuous, high-volume spraying.
- High Flow Rate (2.5L/min) : Does very big areas so fast that time for the job is less, and efficiency is high.
- Adjustable Pressure Range (1000-3000 PSI) : Gives full control to apply to different materials and finishes.
- 1/4" Hose Close Nipple : Hose connection suitable for standard hoses and accessories.
- Standard Voltage: 220V~50Hz : Easily plugs into regular power outlets.
- Airless Technology : Less overspray and finishes that are smooth.
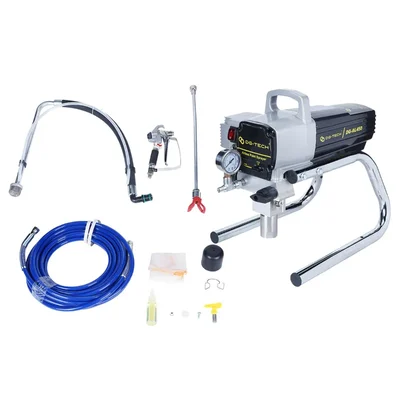
Accessories
:- High-Pressure Hose : The long, coiled blue hose that connects the sprayer unit to the gun.
- Airless Spray Gun : The handheld device used to spray the paint, often including a trigger lock.
- Spray Tip/Nozzle Guard : The red and silver part that attaches to the spray gun, which holds the reversible spray tip.
- Suction Tube (or Inlet Tube) : The curved tube with a filter/screen on the end, used to draw paint from the container.
- Primer/Drain Tube (or Return Tube) : The smaller, usually flexible tube used to prime the pump and return excess paint to the container.
- Tip Wrench/Tool : The small yellow wrench or tool, used for maintenance or installing the spray tip.
- Cleaning Cloth/Filter Element : The small piece of orange/yellow fabric (might be a filter or cleaning rag).
- Pump Armor/Oil : The small bottle of liquid (usually an oil or lubricant for pump maintenance).
Applications
:- Large-Scale Residential & Commercial Painting : Very good for very quickly covering walls, ceilings, and facades with paint or primer.
- Industrial Coating Projects : High volume output for applying protective coatings for machinery, storage tanks, and structural steel.
- Renovation & Construction : Make work faster in building construction, with even coverage and efficient application on a variety of surfaces.
- Wood & Metal Surfaces : For application of finish, sealer, and protective coatings on doors, fences, and furniture.
- Professional Painting Services : Essential equipment for the painter requiring quick work without compromising good finish and quality.
Usage
:Usage
Safety & preparation
- Always wear PPE: eye protection or goggles, respirator or mask suitable for paint/solvent vapors, gloves, coveralls or protective clothing.
- Operate in well-ventilated area to avoid inhaling fumes.
- Treat the spray as high pressure: never point the nozzle/trigger at yourself or others. A high‑pressure jet can penetrate skin.
- Before servicing or clearing blockages, always follow the pressure relief procedure (see below).
- Ensure the electrical supply is safe: proper grounding, correct rated extension cable (if used), and stable supply voltage.
- Only use coatings and solvents compatible with the pump materials (avoid solvents that chemically attack seals, aluminum parts, etc.).
Setup & priming
- Position the sprayer unit on stable, level ground near your paint container.
- Connect the suction (inlet) hose into the paint container (or use supplied suction tube).
- Connect the high-pressure hose to the sprayer’s outlet and to the spray gun.
- Install the spray tip (nozzle) in the gun and tighten securely.
- Set the sprayer’s valve or control (some units have a prime/flush/operate selector) to the prime mode (or a low-pressure draw).
- Turn on the machine (power ON) so that the pump draws paint through until paint appears at the gun (primed).
- With gun locked or safety on, then gradually increase pressure via the pressure control knob until you get a good spray atomization. Do not immediately push to full pressure — find the lowest pressure that gives the needed finish.
- Test the spray pattern on a scrap board or test surface. Adjust pressure or tip size if needed.
Spraying technique
- Maintain a consistent distance from gun to surface (commonly 20–30 cm, but check with test pattern).
- Keep the gun perpendicular to the surface and move in smooth strokes.
- Use overlapping passes (often ~50% overlap) to ensure even coverage.
- Start moving the gun first, then pull the trigger; release trigger just after leaving the surface (to avoid buildup at start/stop).
- Avoid stopping mid‑stroke if possible — if you must, release trigger (i.e. stop spray) first, then reposition and resume.
- If you see spitting or gaps, slow down or increase pressure slightly (within safe limits).
- Do not exceed the design pressure or maximum tip size recommended (too much pressure or an oversize tip leads to wear, waste, poor finish).
Pressure relief before servicing
- Before doing any cleaning, tip changes, hose disconnections, or maintenance:
- Turn the sprayer off (power OFF).
- Engage the gun’s safety lock (or lock the trigger).
- Shift the sprayer valve (if present) to the “relief / prime / flush” position (i.e. open bypass).
- Point the gun into a suitable waste bucket and trigger the gun (while locked to metal) to release residual pressure.
- Only after confirming pressure is relieved (fluid has dribbled, no pressure buildup) should you open any couplings or disassemble parts.
Maintenance
After every use (end of job / daily)
- Flush the system immediately after finishing : Use the proper cleaning fluid/solvent for the paint type (water for latex/waterborne, mineral spirits or manufacturer‑recommended solvent for oil/solvent systems).
- Remove the tip/nozzle (or at least retract it) and run fluid until clear (no paint) at the gun.
- Open the prime/flush valve (if available) and allow fluid to circulate to flush internal passages.
- Clean filters, strainers, and gun parts: remove and wash any inlet filter, gun filter, screen, or mesh.
- Wipe down the exterior (hoses, body, gun) with solvent‑dampened cloth (not immersing the motor).
- Inspect hoses, fittings, seals, O‑rings, connections for damage, leakage, wear. Replace any suspect parts.
Periodic / scheduled maintenance
- Depending on use intensity, at weekly or after a certain number of hours:
- Inspect or replace pump packing, O‑rings, gaskets, seals if showing wear or leakage.
- Check and clean or replace valves (inlet/outlet), seats, check balls in the pump.
- Replace worn spray tips / nozzles — a worn tip gives poor pattern, overspray, and inefficient use of paint.
- For units with motor brushes: inspect brush length and wear. If brushes are low (per manufacturer spec), replace them.
- Clean motor housing, vents, blow dust out (with compressed air, motor off).
- Lubricate parts as recommended (e.g. packing gland or throats, if applicable).
- Tighten any loose bolts, couplings, fittings, hose clamps.
Long-term storage
- If you expect to leave the unit idle for days or weeks:
- After final cleaning/flushing, run a small volume of a protective fluid (e.g. light oil or compatible preservative) through the pump and hose to coat internal metal surfaces, preventing corrosion or drying of seals.
- Disconnect and store hoses, gun, and accessories separately in a clean, dry place.
- Cap fluid inlets/outlets to prevent ingress of dust or moisture.
- Periodically (once in a while) turn the sprayer on with minimal pressure and circulate the protective fluid (if possible) to keep internal parts from drying out.
Troubleshooting & tips
- Weak pressure / poor spray: check for clogged filters, suction leaks, air ingress in suction line, worn pump seals, or low fluid in tank.
- No paint flow: ensure suction hose is unobstructed, prime valve is open for suction, fluid viscosity is acceptable.
- Irregular spray / mottling: dirty or clogged tip, worn tip, insufficient pressure, or bad gun seat.
- Leaks: inspect and tighten fittings, replace worn seals.
- Motor issues: check brushes, wiring, switch, power supply.
- Always replace parts with correct, manufacturer‑specified spares.
Ask AI

 AI-generated answers may be inaccurate. Double-check critical facts.
 Questions & Answers (0)

Select attribute