- Farm & Garden
- Pumps & Motors
- Food Processing
- Workshop, DIY & MRO
- Lab & Measuring Tools


Brand: Xtra Power
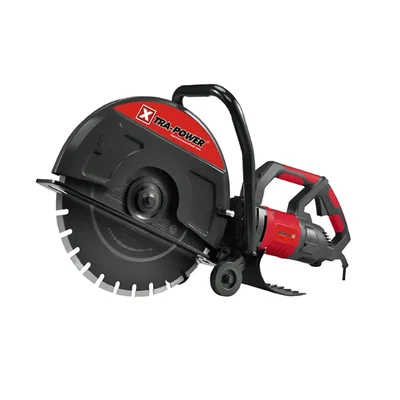
Xtra Power 400 mm Concrete Saw, 4300 RPM & 3.2 KW Max. Power (XPT 566)
SKU: TI-XP-12701
 15 people have bought this recently
  Estimated Delivery By: Jul 15 - Jul 17


MRP : ₹27200
15 people have bought this recently Estimated Delivery By: Jul 15 - Jul 17 Easy Return
& Refund
& Refund
Quality
Assurance
Assurance
Trusted
Delivery
Delivery
After Sales
Assistance
Assistance
Buyer
Protection
Protection
₹27200 (Including GST)
Get Extra ₹408 OFF on Prepaid Orders
QTY :
-
1
+
Short Description
Xtra Power 400 mm Concrete Saw
Max. Speed 4300 RPM
Max. Power 3.2 KW
Country of origin: China
Specifications
- Brand: Xtra Power
- Weight (Approx.) : 18 kg
- Power : 3.2 kw
- Speed : 4300 rpm
- Cutting Size : 400 mm
- Net Quantity : 1 pc
- Model No : XPT 566
- Product Type : Concrete Saw
- Brand : Xtra Power
- Power Source : Double Insulation Electric Corded
- Voltage : 220-240 V
- Frequency : 50-60 Hz
- Max. Power : 3.2 KW
- Max. Speed : 4300 RPM
- Max. Blade Size : 400 mm
Package Contains :
- 1 unit Concrete Saw
- 1 Diamond Disc Blade
- 1 Pair Carbon Brush
- 1 unit Water Pump
- 1 unit Tool Kit
- 1 unit Pipe
- 1 unit User Manual
Note : This product comes with only one blade.
Description
The XPT-566 Concrete Saw is a powerful and versatile cutting tool that delivers precise cutting performance throughout the project length. With its low-vibration design, this saw provides a smooth cutting experience, reducing user fatigue and enhancing productivity. The dual-integrated dust management system on this saw is another standout feature, providing a cleaner cutting environment.
Features
:- Lightweight
- Controllable handle
- Strong and efficient motor
- Less strain and maximized productivity
- Superior power-to-weight ratio for organized performance
Usage
:Assembly Guidance :
1. Unbox and Inspect Components
- Ensure all parts are present: saw body, 400 mm diamond blade, handle, blade guard, bolts, and user manual.
2. Attach the Handle
- Align the handle with the mounting points on the saw body.
- Secure it using the provided bolts and washers.
- Tighten the bolts firmly but avoid overtightening to prevent damage.
3. Install the Blade Guard
- Position the blade guard around the blade mounting area.
- Align it with the screw holes on the saw body.
- Fix the guard in place using the screws or bolts provided.
- Ensure the guard covers the blade properly for safety.
4. Mount the Blade
- Ensure the saw is unplugged or disconnected from power.
- Remove the spindle nut or flange on the saw shaft by turning counterclockwise (use wrench).
- Place the 400 mm diamond blade onto the spindle, ensuring the rotation arrow on the blade matches the saw’s rotation direction.
- Replace the flange and spindle nut.
- Tighten securely with a wrench (do not overtighten to avoid damaging the blade or spindle).
5. Check Blade Alignment and Clearance
- Manually rotate the blade to ensure it spins freely without touching the blade guard or other parts.
- Adjust if necessary.
6. Final Inspection
- Double-check all bolts and nuts are tight.
- Confirm the blade guard is securely in place.
- Verify the handle is firmly attached.
- Ensure the power cable or cord is intact and properly routed.
How to Use it :
1. Preparation
- Read the manual: Before operating, thoroughly read the user manual for safety instructions and operational details.
- Wear safety gear: Always wear protective equipment including safety goggles, ear protection, dust mask, gloves, and sturdy footwear.
- Check the blade: Ensure the 400 mm diamond blade is suitable for cutting concrete and is securely attached.
- Inspect the saw: Check the saw for any damage or loose parts, and ensure all guards are in place.
2. Setup
- Place the saw on a stable, flat surface near the cutting area.
- Connect the saw to a suitable power source (confirm voltage matches saw specifications).
- Ensure the workpiece (concrete slab or block) is stable and secured to avoid movement.
3. Starting the Saw
- Hold the saw firmly with both hands.
- Switch on the saw and allow it to reach full speed (up to 4300 RPM).
- Let the blade reach full rotation speed before making contact with the material.
4. Cutting
- Position the saw blade at the start of the intended cut line.
- Gently lower the blade onto the concrete, applying steady and controlled pressure.
- Do not force the saw; let the blade do the cutting.
- Maintain a firm grip and steady movement, moving the saw forward along the cutting line.
- Keep the saw’s blade guard in place and avoid removing it.
5. Finishing
- Once the cut is complete, carefully lift the saw away from the concrete.
- Turn off the saw and wait for the blade to come to a complete stop before setting it down.
- Disconnect the power supply if you need to change blades or move the saw.
6. After Use
- Clean the saw and blade of dust and debris.
- Inspect the blade for wear or damage.
- Store the saw in a safe, dry place.
Questions & Answers (0)


Select attribute