- Farm & Garden
- Pumps & Motors
- Food Processing
- Workshop, DIY & MRO
- Lab & Measuring Tools


<
>


Brand: Generic ( Made in India )
DG-Tech 4000 W Brushless Motor Airless Paint Sprayer For Putty Materials
SKU: TI-D4-46106
 1203 people have viewed this recently
  Estimated Delivery By: Jul 22 - Jul 24


MRP : ₹164000 ₹135999
17% OFF!
1203 people have viewed this recently Estimated Delivery By: Jul 22 - Jul 24 Easy Return
& Refund
& Refund
Quality
Assurance
Assurance
Trusted
Delivery
Delivery
After Sales
Assistance
Assistance
Buyer
Protection
Protection
₹135999 (Including GST)
MRP : ₹164000
17% OFF!
Get Extra ₹2,040 OFF on Prepaid Orders
QTY :
-
1
+
Short Description
DG-Tech 4000 W Airless Paint Sprayer
1000-3000psi Pressure Range
Country of origin: India
Specifications
- Brand: Generic ( Made in India )
- Weight (Approx.) : 83 kg
- Voltage : 220V~50Hz
- Motor Rating : 4000W
- Hose Close Nipple : 3/8"
- Max. Volume Flow : 7L/Min
- Range of Pressure : 1000-3000psi
Description
The DG-Tech Airless Putty Sprayer 1096 is a powerful heavy machine for the spraying of thick materials such as wall putty and heavy coating. This high capacity sprayer at 7L/min is powered by a massive 4000W brushless motor, granting it efficiency, pressure stability, and durability. Hence, any contractor and builder working on large surface preparation and finishing work would want one for themselves.
Features
:- Powerful 4000W Brushless Motor : Strong, maintenance-free performance with utmost durability.
- High Volume Flow (7L/min) : Deployment of thick putty and plaster material without difficulties and swiftly.
- Pressure Range (1000-3000 PSI) : Pressure adjusted to cocktail various MC material types and finishing quality requirements.
- 3/8" Hose Close Nipple : Stabilizes and secures the hose attachment for heavy material flow.
- Voltage : 220V~50Hz Compatible with standard electrical setup being used at the job site.
- Optimized for Putty Spraying : Designed primarily for medium-to-heavy viscous materials with even output.
- Airless Technology : Smoothly works without clogs or over spray and with a perfect surface finish.
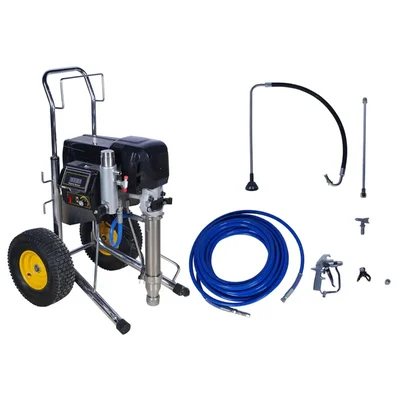
Accessories
:- High-Pressure Hose : The long, coiled blue hose that delivers paint from the pump to the gun.
- Airless Spray Gun : The handheld device used to atomize and apply the paint.
- Suction Tube (Inlet Hose) : The curved metal and black rubber tube with a filter/screen on the end, used to draw paint from the bucket.
- Siphon/Drain Tube (Return Tube) : The straight metal tube (often used for priming/draining excess paint).
- Spray Tip Guard & Tip/Nozzle : The small components shown next to the gun (the black and silver parts), used to hold the reversible spray tip.
- Tip Wrench/Tool : The small T-shaped tool (often yellow, but black in this image) used for maintenance on the pump valves or spray gun.
- Hose Connector/Swivel (Smaller components) : Various small fittings used for connecting the hose or gun pieces.
Applications
:- Interior & Exterior Wall Putty Application : These are best used for spraying thick putty materials on walls and ceilings in both residential and commercial projects.
- Construction & Building Projects : Speeding surface preparation and coating in large developments, it reduces manual work and time.
- Plastering & Wall Finishing : They apply textured coatings and fillers on drywall, cement, and brick surfaces.
- Industrial Surface Treatment : Provide uniform application of high-viscosity materials on huge metal and concrete structures.
- Professional Contractors : Build up for high-performance daily application in demanding environments.
Usage
:Usage :
Safety & Pre‑Checks
- Personal Protective Equipment (PPE) : Wear eye protection, respirator (for dust/fine particles), gloves, coveralls (to avoid skin contact).
- Ventilation & dust control : Because putty may generate dust, ensure work area is well ventilated or use appropriate dust extraction or containment.
- High pressure hazard : The sprayer operates under high pressure. Never aim the spray gun at people or animals. If a jet penetrates skin, it’s a medical emergency.
- Electrical safety : Ensure proper grounding, power supply within rated voltage, use adequately rated cables, avoid extension cords that cause voltage drop.
- Inspect hoses, connections & seals : Before each use, examine for cracks, damage, blockages, loose fittings, worn O‑rings, or leaks.
- Compatibility of materials: Only use putty or filler materials that the unit is rated for (viscosity limit, absence of large aggregates beyond limit, no abrasive contaminants) — check with the manufacturer.
- Clean work area: Remove debris or particles that can clog or damage pump or nozzles.
Setup and Priming
- Place the sprayer unit on a firm, level surface close to your mixing / storage container of putty.
- Prepare the putty: mix thoroughly to a consistency suitable for spraying (remove lumps, fiber clumps, foreign particles; strain if needed). Some putty systems require dilution with water or approved additive — observe manufacturer’s instructions.
- Connect the suction / feed line from the putty container or hopper to the pump’s inlet.
- Connect the high-pressure hose from the pump outlet to the spray gun. Use heavy-duty hose rated for putty / high pressure, with the correct fittings (3/8″, as indicated).
- Install the spray tip / nozzle in the gun - for putty, you’ll generally use a larger orifice or specially designed nozzle meant for thick materials.
- Set any pump / mode selector (if present) into prime / suction mode (to draw material).
- Turn on the unit (power ON). Let the pump draw the putty until it appears at the gun (primed).
- With the spray gun trigger locked/safety on, gradually increase pressure using the control knob until the putty begins to spray. Adjust to find the minimum pressure where the spray is uniform and consistent.
- Test spray on a scrap surface (plasterboard, masonry) to verify pattern, flow, and finish. Adjust pressure or tip size as needed.
Spraying Technique
- Maintain a consistent distance between gun and surface (for thick materials the distance may be different; often somewhat closer than liquid paints).
- Hold the gun perpendicular (or consistent angle) to the surface and move in smooth strokes.
- Use overlapping passes (commonly ~50% overlap) to ensure even coverage and avoid stripes.
- Start moving the gun before pulling the trigger; release the trigger before stopping the motion (to avoid buildup at start/stop).
- Do not linger too long in one spot - too much material accumulation can drip or sag.
- If the spray becomes uneven, spattering, or sputters, pause and check for clogging.
- Use the lowest pressure necessary to get desired coverage - running at maximum pressure continuously accelerates wear.
Pressure Relief Before Service / Maintenance
- Always relieve internal pressure before disassembly or cleaning. Follow this procedure:
- Turn the unit OFF (power off).
- Lock or engage the spray gun safety / lock trigger.
- Switch the pump or mode selector (if applicable) into relief / bypass / prime mode.
- Point the gun into a safe waste container and unlock the trigger; pull the trigger to release residual pressure (fluid drips out).
- Only when flow/pressure is fully relieved and no pressure is felt, you may disconnect hoses, remove tips, open pump heads, etc.
Maintenance :
After Each Use (Immediate / End-of-job)
- Flush / clean the entire fluid path immediately after finishing spraying. Use water or cleaning solution as per the putty manufacturer (or a compatible cleaning fluid) to flush the pump, hose, gun until clean fluid emerges.
- Disassemble and clean the spray tip / nozzle and guard thoroughly. Remove any residual putty carefully (do not scratch sealing surfaces).
- Remove and clean inlet filters / strainers / screens.
- Wipe down external surfaces (hose, gun, pump body) with a cloth and cleaning solvent (be careful around motor / electronics).
- Inspect hoses, seals, O‑rings, fittings for wear, damage, or cracks. Replace suspect parts immediately.
- Tighten any loose fittings or couplings (but avoid overtightening which can damage threads or seals).
Periodic / Scheduled Maintenance (Weekly or after certain hours of use)
- Check and replace pump seals, O‑rings, gaskets, check valves or balls if wear/leakage is detected.
- Inspect motor system (brushless motors are low-maintenance, but check bearings, cooling, wiring).
- Clean or blow out dust or debris from motor housing, ventilation ports (with compressed air, while unit is powered off).
- Check and maintain hose integrity - heavy materials can accelerate internal abrasion. Consider replacing hoses if wall thinning or blisters appear.
- Examine spray tips / nozzles for wear. In putty spraying, nozzle wear is common due to abrasive particles — replace regularly to maintain pattern quality.
- Lubricate any moving / sliding parts (if the machine has recommended lubrication points, such as pump packing glands or linkage) according to manufacturer spec.
- Inspect coupling joints, clamps, fasteners, brackets - ensure nothing loosens under vibration or stress.
- If the unit has pressure sensors, switches, or control electronics, verify proper functioning periodically.
Long-Term Storage (When Idle / Off-Season)
- After thorough cleaning, flush in a protective fluid (e.g., light oil or anti-corrosive preservative) through the pump and hose to coat internal parts, preventing corrosion or seizing.
- Disconnect hoses, gun, tips; cap ports/inlets to protect against dust and moisture.
- Store in a dry, cool, clean location, away from direct sunlight, moisture, dust, or extreme temperature.
- Occasionally (monthly or so), power up (at low/no load) and cycle the pump briefly to circulate protective fluid and ensure parts haven’t seized.
- Keep spare seals, O‑rings, tips in clean, sealed containers to avoid contamination.
Ask AI

 AI-generated answers may be inaccurate. Double-check critical facts.
 Questions & Answers (0)

Select attribute