- Farm & Garden
- Pumps & Motors
- Food Processing
- Workshop, DIY & MRO
- Lab & Measuring Tools


<
>


Brand: Generic ( Made in India )
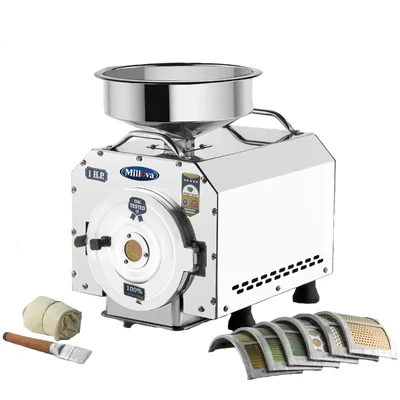
Stainless Steel Table top Cabinet Type 1 HP Atta Chakki, Upto 8kg/hr Output Capacity
SKU: TI-SS-46033
 679 people have viewed this recently
  Estimated Delivery By: Jul 22 - Jul 24


MRP : ₹18399 ₹17499
5% OFF!
679 people have viewed this recently Estimated Delivery By: Jul 22 - Jul 24 Easy Return
& Refund
& Refund
Quality
Assurance
Assurance
Trusted
Delivery
Delivery
After Sales
Assistance
Assistance
Buyer
Protection
Protection
₹17499 (Including GST)
MRP : ₹18399
5% OFF!
Get Extra ₹262 OFF on Prepaid Orders
QTY :
-
1
+
Short Description
Stainless Steel Table top Cabinet Type 1 HP Atta Chakki
Upto 8kg/hr Output Capacity
Country of origin: India
Specifications
- Brand: Generic ( Made in India )
- Weight (Approx.) : 27 kg
- Body Material: Stainless Steel
- Product Type: Table Top Cabinet Type
- Chamber Body : Aluminium
- Number of Blades: 6
- Motor Phase : Single
- Motor Type : Copper Winding
- Capacity: 5 kg Hopper and Bag
- Production Capacity: 7-8 kg /hr
Description
This Stainless Steel Table top Cabinet Type 1 HP Atta Chakki is a premium domestic flour mill designed for efficient, hygienic, and effortless flour grinding at home. Built with a robust stainless steel body, this model offers durability, rust resistance, and modern aesthetics. Its 1 HP heavy-duty motor ensures smooth performance and consistent output of up to 8 kg/hr, making it perfect for family use. The compact table-top cabinet design saves space while adding elegance to any kitchen. This Table top Cabinet Type 1 HP Atta Chakki helps to grinds all types of grains such as wheat, rice, maize, bajra, besan, and pulses delivering fresh, nutritious flour with ease.
Features
:- Powerful 1 HP Motor : It ensures efficient grinding with steady performance and long motor life.
- Stainless Steel Body: Rust-proof, easy to clean, and designed for durability and hygiene.
- Product Design: Its Table Top Cabinet design compact, elegant, and convenient for kitchen placement.
- Multi-Grain Grinding Capability: It is also suitable for grinding wheat, rice, jowar, maize and pulses.
- High Output Capacity: This product delivers up to 8 kg of freshly ground flour per hour.
Applications
:- Domestic Flour Grinding: It is ideal for producing fresh, healthy flour at home.
- Small-Scale Food Businesses: Perfect for boutique bakeries, tiffin services, and micro food units.
- Culinary Institutions : This Atta Chakki is mainly used for teaching and demonstrations on grain processing.
- Rural & Urban Homes : Suitable for both traditional and modern households.
- Cost Efficiency : By milling flour at home, consumers can significantly reduce the cost of purchasing commercially processed flours, especially for specialty flours that may be overpriced in retail settings.
- Convenient and Time-Saving : Table Top cabinet type flour mills are designed for user-friendliness and efficiency. They enable quick milling, making it convenient for busy households to incorporate fresh flour into daily meals.
Usage
:Step 1 : Preparation
Choose Your Grains: Select the grains you wish to mill. This can include wheat, rice, corn, or other specialty grains.
Clean the Grains: Make sure to rinse and dry your grains if necessary to remove any dust or impurities.
Step 2 : Set Up the Machine
Find a Stable Surface: Place the flour mill on a stable surface away from direct sunlight and humidity. Ensure it has easy access to a power outlet.
Connect the Power: Plug the machine into an electric outlet. Ensure it’s properly grounded to avoid electrical issues.
Step 3 : Load the Machine
Fill the Hopper: Pour your chosen grain into the hopper. Make sure not to overfill it to avoid clogging the machine.
Secure the Lid: The machine has a lid for the hopper, ensure it is securely placed before turning the machine on.
Step 4 : Milling Process
Start the Machine: Turn on the machine using the power switch. Allow it a moment to reach optimal operating speed.
Watch for Flow: Ensure that the ground flour is flowing smoothly from the machine into the collection bag. If it appears to be obstructed, pause the milling process and troubleshoot.
Step 5 : Collect the Flour
Turn Off the Machine: Once milling is complete, turn off the machine and unplug it for safety.
Store the Flour: Transfer the freshly milled flour into an airtight container to maintain its freshness and prevent moisture.
Step 6 : Clean the Machine
Clean the Parts: Wipe down the exterior and interior surfaces of the mill to prevent flour buildup. Use a brush or a dry cloth as necessary.
Store Properly: If the machine will not be used for an extended period, store it in a cool, dry place.
Ask AI

 AI-generated answers may be inaccurate. Double-check critical facts.
 Questions & Answers (0)

Select attribute